The camera menu, on the controller in your hands.
MavCam puts exposure, focus, zoom, video, gimbal and geotag status on top of QGC, Solex or MissionPlanner on a HereLink, SIYI or Skydroid controller. It’s the on-screen interface for the ENTIRE R3 or TAG-E on your aircraft, so changing ISO doesn’t take a second screen, a laptop or a landing.
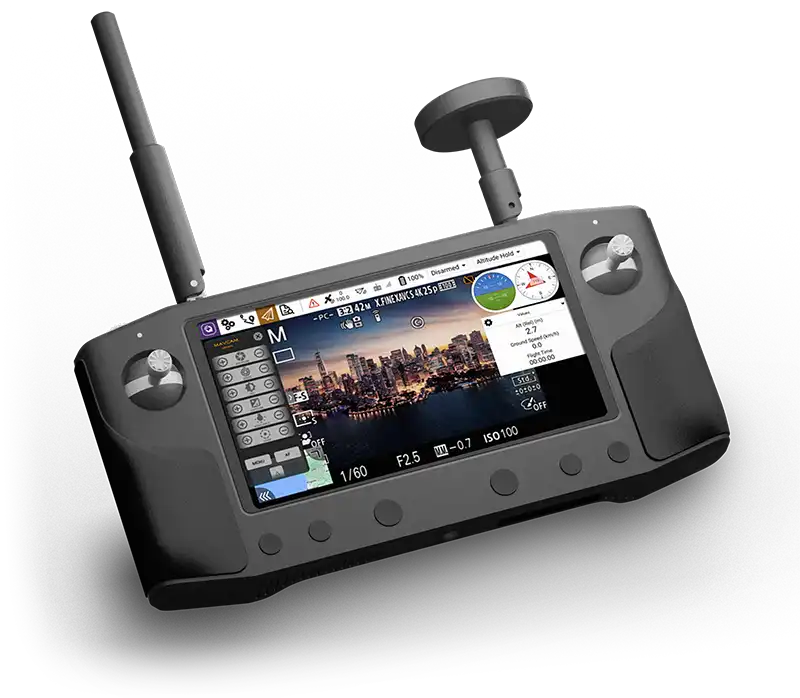
An overlay, not another ground station.
MavCam doesn’t replace QGroundControl, Solex or MissionPlanner; it’s drawn on top of them. You keep the map, mission and telemetry you already fly with, and the camera controls sit in a panel above them. Your flight setup stays as it is.
It sits on top of your GCS
Because MavCam is an overlay, it works over whichever control app you use, whether that’s QGC, Solex or MissionPlanner. Swipe it away when you need the whole map and swipe it back for the camera.
The aircraft does the talking
MavCam is only the interface. Talking to the camera over USB, WiFi or Bluetooth and writing the geotags is the job of an ENTIRE R3 or a TAG-E on the airframe. Without one of those, MavCam has nothing to drive.
One UI across the whole fleet
Sony, Canon, PhaseOne, ADTi, ViewPro, ShareUAV and Workswell all use different protocols, but the screen works the same way for each. Swap the payload and your muscle memory still applies.
What it can’t do alone. MavCam is a MAVLink front end and controls nothing by itself. It needs an AirPixel controller on the aircraft, and how much of the camera you can reach depends on that controller and the camera, not on the app. Tell AirPixel which body you fly and they’ll tell you what’s covered.
The settings you’d otherwise walk over to the camera for.
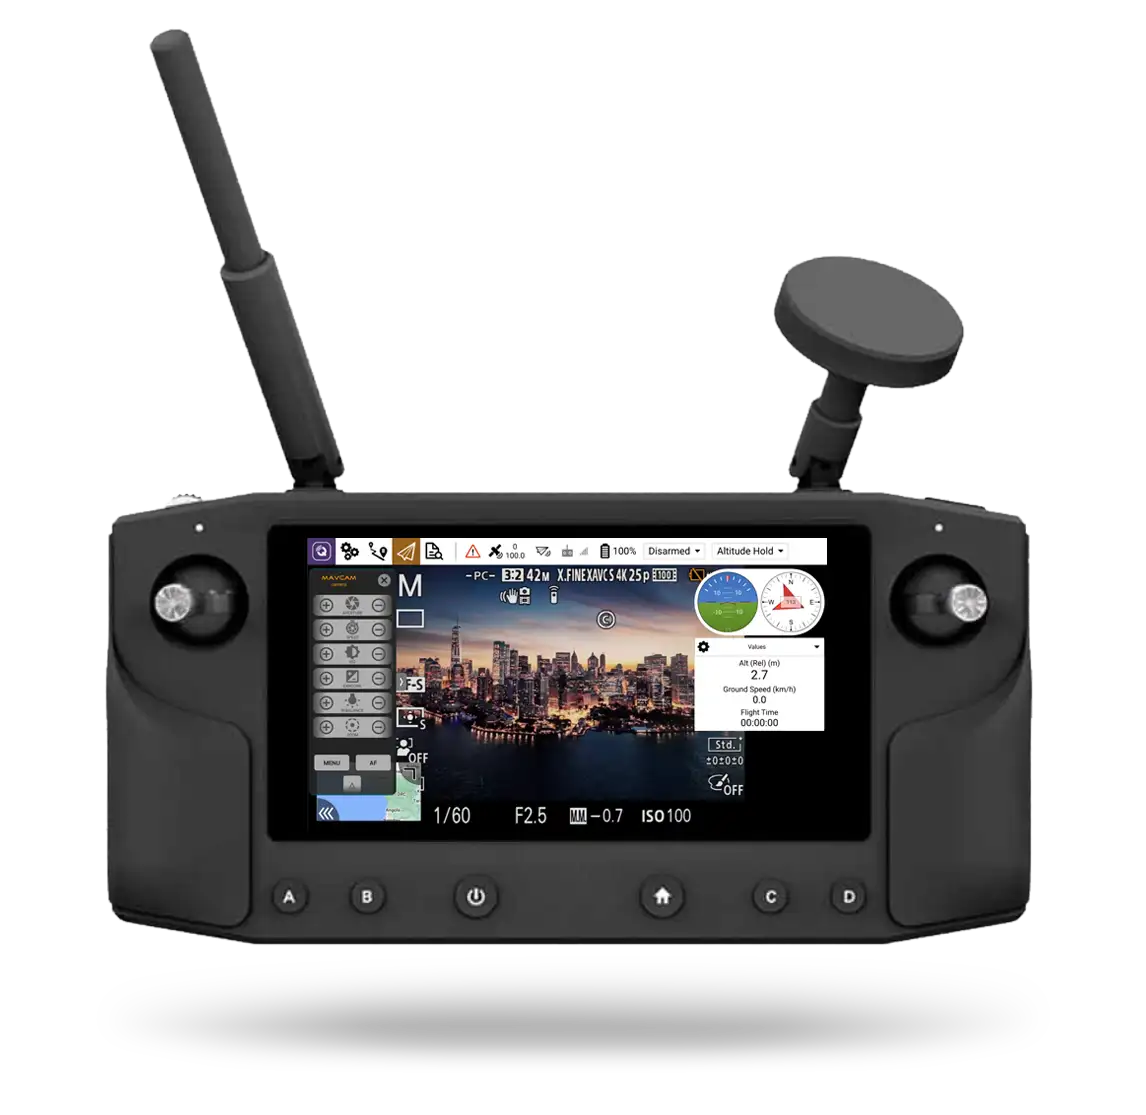
This is MavCam on a real HereLink. Exposure and focus sit in a column on the left, a handle swipes the whole panel out of the way, and QGC keeps running underneath.
-
The exposure stack
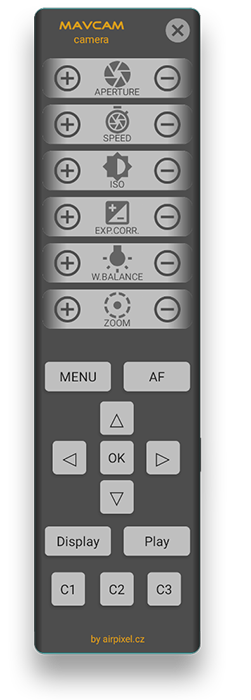
Aperture, speed, ISO, exposure correction and white balance, each as its own row with a plus and a minus. Values come back from the camera, so what you read is what the body is actually set to.
-
Focus and zoom
Autofocus mode, manual focus and zoom sit on the same stack. Both panels scroll; swiping the zoom icon left or right gives you proportional zoom on cameras that support it.
-
The handle
The whole overlay hangs off one handle, which you can see opened and closed in the clip. Swipe right for MavCam’s own settings, up for camera configuration, left to hide it when the keyboard or the map needs the room.
-
Your ground station, underneath
The bar across the top and the telemetry along the bottom belong to QGC. MavCam is drawn in front of it, and the mission keeps running behind the panel.
-
Gimbal shortcuts
Snap between horizon and straight down, re-centre the camera attitude, or hand gimbal control back to another source (Ardupilot only).
-
Gimbal joystick
Tilt and yaw under your thumb, sent as MAVLink. On a HereLink the physical tilt wheel does the same, with no SBUS wiring.
Four gestures and you have the whole app
MavCam is meant to be used with gloves on, in bright sun, while the aircraft is flying. Almost everything hangs off the main handle.
Trim it down to what you fly
A zoom panel on a prime lens is just clutter. Unused controls can be switched off centrally, and they disappear from both the left strip and the hardware-button menu at once.
Set once on the ground, in the ENTIRE’s own web interface. MavCam picks the change up on the next connection.
Settings you’d otherwise land for.
Plenty of systems can fire the camera. MavCam also reaches the settings you’d otherwise have to land and dig through a menu for. How much of this you get depends on the camera behind the controller.
Exposure
ISO, aperture, shutter speed, white balance and exposure compensation. On bodies that allow it, P / A / S / M mode switching too. Change the look mid-mission instead of accepting the one you took off with.
ISOAPERTURESHUTTERWBEVP/A/S/MFocus
Trigger autofocus, switch AF mode, or take manual focus control from the screen. On PhaseOne bodies that extends to AF strategy, a fixed focus distance and AF bracketing.
TRIGGER AFAF MODEMF STEPAF BRACKETZoom
Step or proportional zoom on payloads that support it. Swipe the zoom icon left or right and the lens follows the gesture instead of jumping in fixed increments.
ZOOM INZOOM OUTPROPORTIONALStills and video
Single shot, start and stop recording, and on supported bodies the camera’s own interval and auto-trigger modes: horizontal, vertical, 3D or timed capture, set by distance or interval.
PHOTOREC START/STOPAUTO-TRIGGERTIMELAPSEThe camera’s own menus
On Sony, PhaseOne and RED bodies MavCam can reach into the native menu system, so a setting with no dedicated button is still reachable from the ground.
MENU ACCESSNAVIGATECONFIRMStorage and output
On PhaseOne P3: format the card, create folders, write custom XMP metadata, switch the payload into USB mass storage, and configure the HDMI output and its overlay mode without touching the aircraft.
FORMATNEW FOLDERCUSTOM XMPHDMITune the gimbal in the air, not on the bench.
Gimbal tuning on the ground is a guess. The payload is not loaded the way it will be, the airframe is not vibrating the way it will, and the wind is not doing anything at all. If you fly a Gremsy or a SimpleBGC, MavCam lets you adjust it while the aircraft is actually flying.
- Stiffness, power and gain, in flight. Change a value, watch the horizon, change it again, without landing between attempts.
- Tilt and yaw control from the on-screen joystick or the HereLink tilt wheel, sent as MAVLink.
- Horizon / down toggle and re-centre as single taps, for when a shot has drifted and you want a known reference back.
- Hand control back to another source when the autopilot or a second operator should take over (Ardupilot only).
- The same gimbal angles the ENTIRE is writing into your EXIF are the ones you are steering here.
Remote stabilisation tuning
Gremsy and SimpleBGC users get a tuning panel that no other AirPixel product has. MavCam is the only way to set these values remotely.
The values shown illustrate the panel and aren’t a recommended tune. Start from your gimbal manufacturer’s defaults.
Built for HereLink. Not limited to it.
MavCam was developed for the HereLink and still fits it best, because that’s the controller whose C and D buttons, shutter key and tilt wheel it can map. It also runs on other Android-powered controllers once MAVLink connectivity is set up.
HereLink, the home platform
Everything works here: the overlay, the C & D tool, the hardware photo and video buttons and the physical tilt wheel. Range of up to 20 km in FCC regions, up to 12 km in CE.
SIYI, Skydroid and other Android RCs
The on-screen interface works the same on SIYI and Skydroid controllers and on other Android-powered remotes, once you point MavCam at the right IP and port for that radio’s MAVLink stream.
Hardware keys are a HereLink story. The C & D tool, the HW shutter button and the tilt wheel are mappings onto the HereLink’s own physical controls. On a SIYI or Skydroid you get the full on-screen interface; what you do not automatically get is that radio’s buttons wired to the same functions. The overlay itself, and the camera control behind it, are identical.
Not only aircraft
The same setup drives a gimbal and camera on a ground vehicle, a wildlife buggy or a fixed mast. MAVLink does not care what the payload is bolted to.
Any autopilot on MAVLink
PixHawk, Cube and the rest of the ArduPilot and PX4 world. The ENTIRE reads GPS from the autopilot’s serial port and takes MAVLink commands back.
Any GCS underneath
QGroundControl, Solex and MissionPlanner have all been flown with MavCam on top. It draws in front of them rather than talking to them.
Real payloads, real screens.
AirPixel filmed MavCam driving several of these payloads end to end. The clips are worth a few minutes before you buy.
Put the camera on the screen you are already holding.
MavCam is the app; the ENTIRE R3 or TAG-E on the aircraft does the work. Tell AirPixel your camera, gimbal and controller, and they’ll tell you which of the two you need and which cable set goes with it.