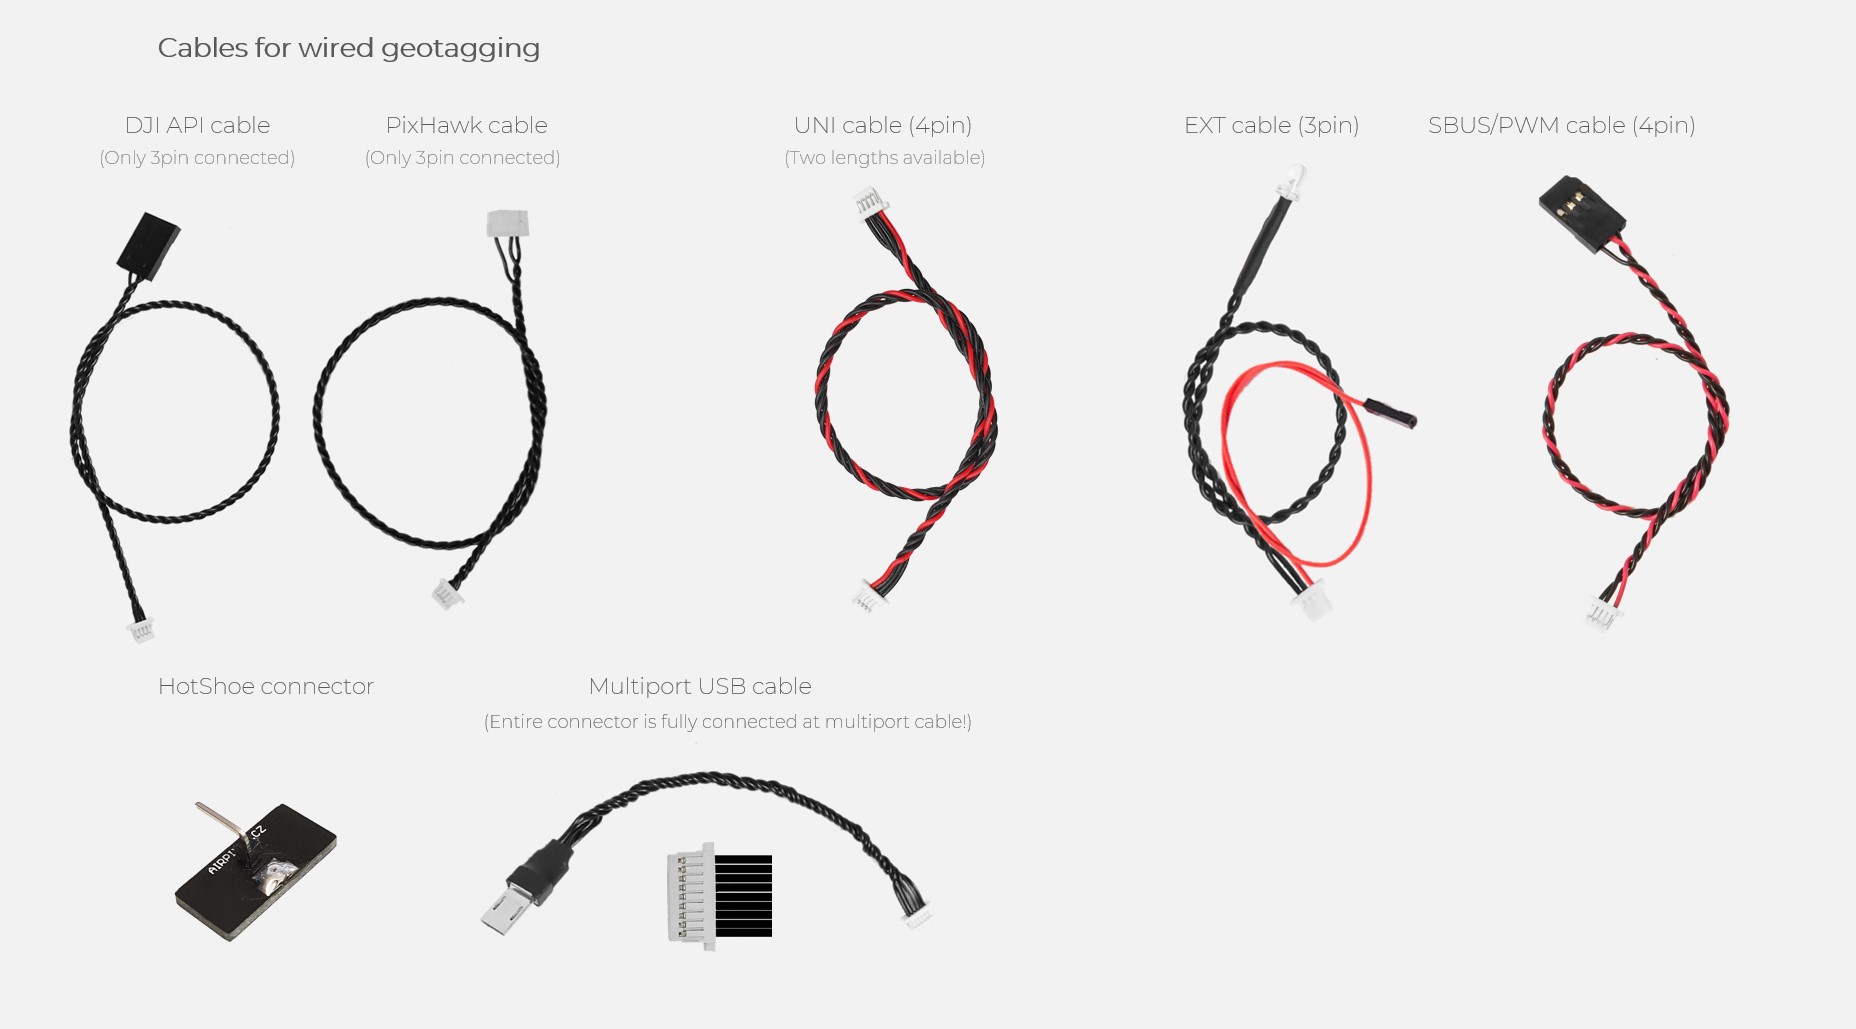
Universal set installation for PixHawk

Installation basics #

For the GeoTagging mode, the AIR Commander Entire must be connected to Sony or ADTi Camera via Multiport Cable.  Multiport cable was included in your geotagging cable set.

For Canon cameras, you have to use WiFi remote control and USB connection is not used!


Installation #

STEP 1

  • Connect the PixHawk cable to the Cube Telem 1 or 2

STEP 1a

Thread the cables down through the body of the drone

STEP 2

  • At PixHawk you have two options depending on used flight stack (ArduCopter/PX4).
  • For ArduCopter you need to connect the only the Telem1 or Telem2 or GPS1 (needs connector rework) to the Extension BOX. Triggering and camera control can be done via MavLink or HereLink buttons (Solex app) or our Android app.
  • For PX4 flight stack camera trigger needs to be done via PWM from flight controller. Use SBUS/PWM Cable for connection to PixHawk.
  • You are free to use any of UNI port, in this manual we will use UNI3 for MavLink.

STEP 3

  • UNI Cable from the Extension BOX DATA port needs to be connected to the Entire r3 port UNI A, B or C. For the Entire r2 only PORT A is suggested.
  • Because UNI Cable is usually not long enough to pass the distance from the drone body to the gimbal, you can use Joining unit to interconnect two UNI cables.
  • Joining units also does a safety guard to avoid wire interruption.

STEP 4

  • Remember to configure PORT A, B or C (depending on your selection) in the Entire’s menu to “Extension BOX” mode.
  • Once Extension BOX is properly connected and configured in the Entire, STATUS LED of the Extension BOX will start blinking GREEN and Entire overview page will show selected port highlighted as “Online”. Also you will get four new ports available for input.
    If port ststus become orange for FW update – DO NOT DISCONNECT

STEP 5 – optional

  • Insert HotShoe connector into HotShoe of your Camera
  • Connect HotShoe cable to EXT port of the Entire
  • Red wire from the cable connect to the pin of HotShoe connector.
  • IR LED should be mounted at the Camera IR sensor. If not necessary, you can disconnect pins of the LED from the EXT connector and use single red wire only.
  • Remember to turn ON the HotShoe sensing in the Entire’s configuration

STEP 6

  • Configure proper Telemetry port to the budrate of 1 500 000bps
  • Configure proper Telemetry port to the MavLink2 protocol

STEP 7

  • Search section named SRx (x is number of port you used)
  • Make sure all SRx items are set to 0

STEP 7a

  • For newest Ardupilot firmware set CAM1_TYPE to 5 (MavLink)
    • If you do not have this parameter in the list, ENTIRE will work without this configuration.
    • If you use CAM1 mount already, you can use also CAM2_TYPE

STEP 8

  • Open Entire’s MENU –> Miscellaneous (Other) –> Mavlink baudrate set to 1 500 000
  • Click to “UNI port 3” bar and in new window select MavLink. Port should become “online” in few seconds.


  • Numbers under icon are input GPS/ATTI stream coresponding to incoming GPS updates frequency and Attitude update frequency. Optimal is 50/10, but numbers may float a bit.

STEP 9

  • Enable GeoTagging via MENU->Logging mode-> Direct EXIF (or SD card)
  • Enable HotShoe capturing via MENU->Capture detection->Hotshoe sync
  • Now you can also preview GPS data in the Entire’s GUI
  • MENU->(Geotagging)Settings->GPS Data Preview
  • Data shown in the preview are updated online and should react to frame movements (if frame angles reading is enabled)

STEP 10

  • Open the MENU -> Miscellaneous
  • Scroll down to GeoTagging features
  • And insert X, Y, Z offsets.
  • When GPS is used, offset is counted from body center (if correct offset is configured in the FC). If your flight controller does not have configured antennas offsets, configure offset from the camera to the antenna.
  • When RTK is used, offset is counted from body center (if correct offset is configured in the FC). If your flight controller does not have configured antennas offsets, configure offset from the camera to the antenna A.
 

Offset is in millimeters!

STEP 11 (Sony & ADTi)

  • Turn the camera USB mode to MASS STORAGE
  • Navigate to Camera MENU -> SETUP->USB Connection
    • Set to Mass Storage
    • confirm OK
  • For newer cameras (like A7RIV) is this step bit more complicated:
    • Check if MENU->NETWORK->Ctrl w/ Smartphone is OFF
    • Check if MENU->NETWORK->PC Remote Function is OFF
    • Navigate to Camera MENU -> SETUP->USB Connection
      • Set to Mass Storage
      • confirm OK

STEP 12

  • Enable GeoTagging via MENU->Logging mode-> Direct EXIF (or SD card)
  • Enable HotShoe capturing via MENU->Capture detection->Hotshoe sync
  • Now you can also preview GPS data and gimbal angles in the Entire’s GUI
  • MENU->(Geotagging)Settings->GPS Data Preview
  • Data shown in the preview are updated online and should react to gimbal movements

STEP 13

  • Your setup is ready to be used at this point
  • Entire has Self-Test routines for GeoTagging to easily check if all wiring is working well
  • Make sure that all equipment is turned ON and camera is set to MASS STORAGE MODE
  • Click to MENU->Configuration test and let the Entire to do a self-test
    • At the beginning of the test, one photo will be triggered
    • Entire will check if HotShoe sensor has properly recognized trigger
    • Entire will check all necessary input data connections
    • In case of any problems, result will provide hints to solve the issue
    • Test photo will not be geotagged in the test method!
Overall wiring scheme #
Installation basics

For the GeoTagging mode, the AIR Commander Entire must be connected to Sony or ADTi Camera via Multiport Cable.  Multiport cable was included in your geotagging cable set.

For Canon cameras, you have to use WiFi remote control and USB connection is not used!


Installation

STEP 1

  • Connect the PixHawk cable to the Cube Telem 1 or 2

STEP 1a

Thread the cables down through the body of the drone

STEP 2

  • At PixHawk you have two options depending on used flight stack (ArduCopter/PX4).
  • For ArduCopter you need to connect the only the Telem1 or Telem2 or GPS1 (needs connector rework) to the Extension BOX. Triggering and camera control can be done via MavLink or HereLink buttons (Solex app) or our Android app.
  • For PX4 flight stack camera trigger needs to be done via PWM from flight controller. Use SBUS/PWM Cable for connection to PixHawk.
  • You are free to use any of UNI port, in this manual we will use UNI3 for MavLink.

STEP 3

  • UNI Cable from the Extension BOX DATA port needs to be connected to the Entire r3 port UNI A, B or C. For the Entire r2 only PORT A is suggested.
  • Because UNI Cable is usually not long enough to pass the distance from the drone body to the gimbal, you can use Joining unit to interconnect two UNI cables.
  • Joining units also does a safety guard to avoid wire interruption.

STEP 4

  • Remember to configure PORT A, B or C (depending on your selection) in the Entire’s menu to “Extension BOX” mode.
  • Once Extension BOX is properly connected and configured in the Entire, STATUS LED of the Extension BOX will start blinking GREEN and Entire overview page will show selected port highlighted as “Online”. Also you will get four new ports available for input.
    If port ststus become orange for FW update – DO NOT DISCONNECT

STEP 5 – optional

  • Insert HotShoe connector into HotShoe of your Camera
  • Connect HotShoe cable to EXT port of the Entire
  • Red wire from the cable connect to the pin of HotShoe connector.
  • IR LED should be mounted at the Camera IR sensor. If not necessary, you can disconnect pins of the LED from the EXT connector and use single red wire only.
  • Remember to turn ON the HotShoe sensing in the Entire’s configuration

STEP 6

  • Configure proper Telemetry port to the budrate of 1 500 000bps
  • Configure proper Telemetry port to the MavLink2 protocol

STEP 7

  • Search section named SRx (x is number of port you used)
  • Make sure all SRx items are set to 0

STEP 7a

  • For newest Ardupilot firmware set CAM1_TYPE to 5 (MavLink)
    • If you do not have this parameter in the list, ENTIRE will work without this configuration.
    • If you use CAM1 mount already, you can use also CAM2_TYPE

STEP 8

  • Open Entire’s MENU –> Miscellaneous (Other) –> Mavlink baudrate set to 1 500 000
  • Click to “UNI port 3” bar and in new window select MavLink. Port should become “online” in few seconds.


  • Numbers under icon are input GPS/ATTI stream coresponding to incoming GPS updates frequency and Attitude update frequency. Optimal is 50/10, but numbers may float a bit.

STEP 9

  • Enable GeoTagging via MENU->Logging mode-> Direct EXIF (or SD card)
  • Enable HotShoe capturing via MENU->Capture detection->Hotshoe sync
  • Now you can also preview GPS data in the Entire’s GUI
  • MENU->(Geotagging)Settings->GPS Data Preview
  • Data shown in the preview are updated online and should react to frame movements (if frame angles reading is enabled)

STEP 10

  • Open the MENU -> Miscellaneous
  • Scroll down to GeoTagging features
  • And insert X, Y, Z offsets.
  • When GPS is used, offset is counted from body center (if correct offset is configured in the FC). If your flight controller does not have configured antennas offsets, configure offset from the camera to the antenna.
  • When RTK is used, offset is counted from body center (if correct offset is configured in the FC). If your flight controller does not have configured antennas offsets, configure offset from the camera to the antenna A.
 

Offset is in millimeters!

STEP 11 (Sony & ADTi)

  • Turn the camera USB mode to MASS STORAGE
  • Navigate to Camera MENU -> SETUP->USB Connection
    • Set to Mass Storage
    • confirm OK
  • For newer cameras (like A7RIV) is this step bit more complicated:
    • Check if MENU->NETWORK->Ctrl w/ Smartphone is OFF
    • Check if MENU->NETWORK->PC Remote Function is OFF
    • Navigate to Camera MENU -> SETUP->USB Connection
      • Set to Mass Storage
      • confirm OK

STEP 12

  • Enable GeoTagging via MENU->Logging mode-> Direct EXIF (or SD card)
  • Enable HotShoe capturing via MENU->Capture detection->Hotshoe sync
  • Now you can also preview GPS data and gimbal angles in the Entire’s GUI
  • MENU->(Geotagging)Settings->GPS Data Preview
  • Data shown in the preview are updated online and should react to gimbal movements

STEP 13

  • Your setup is ready to be used at this point
  • Entire has Self-Test routines for GeoTagging to easily check if all wiring is working well
  • Make sure that all equipment is turned ON and camera is set to MASS STORAGE MODE
  • Click to MENU->Configuration test and let the Entire to do a self-test
    • At the beginning of the test, one photo will be triggered
    • Entire will check if HotShoe sensor has properly recognized trigger
    • Entire will check all necessary input data connections
    • In case of any problems, result will provide hints to solve the issue
    • Test photo will not be geotagged in the test method!
Overall wiring scheme