AIR Commander Link and Link v2 can be updated via Entire’s web GUI. Firmware for the Link and Link v2 is burned in the Entire’s firmware. Available firmware version can differ per Entire’s firmware image.
Firmwar eupdate must be done twice, once for Link Receiver and once for Link Transmitter unit.
Life is not perfect. Firmware update failure may occur due to cable issue, power issue or many other reasons. AIR Commander Link can be recovered from almost any failure, here is procedure:
STEP 1
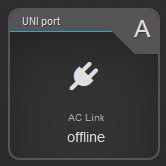
Connect AIR Commander Link to UNI A/B/C port.
Configure port to AC Link mode.
STEP 2
Open Entire’s MENU
Navigate to Miscellaneous
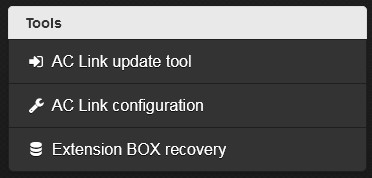
Scroll down to “TOOLS”
Click to AC Link update tool
STEP 3
Follow commands shown in update tool window:
Disconnect device wire
Then press ENABLE
STEP 4
Reconnect device cable
Then press PROBLEMS?
STEP 5
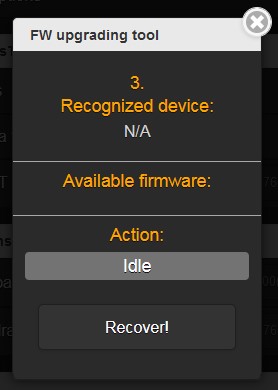
New window will not show connected device.
Press “RECOVER!“
Entire will now try to:
discover what kind of device is connected
detect proper firmware from internal database
recover device
STEP 6
Entire will now upload new firmware
DO NOT POWER OFF
STEP 7
A successful firmware update is confirmed by a “SUCCESS” message.
The A9 SmartPlug firmware update process is very similar to the LINK update described above. However, there are some minor differences and risks, so do not start this process if you have an important job coming up soon. We do not recommend this procedure if you do not need any of the new features.
New firmware 105 for A9 SmartPlug brings:
Default battery charge state is 50% if ENTIRE is not connected (was 0%). Once ENTIRE is connected the SmartPlug battery charge status will get to 100%
Newly can be controlled via SmartPlug “focus point joystick” (Left / Right / Up / Down / Center)
Newly can be controlled C1 and C2 HW buttons of the camera via A9 SmartPlug
Feel free to drop us email if you are not sure about this.
STEP 1
Make sure your ENTIRE is running latest firmware (at least 1.746)
Disconnect all cables from A9 SmartPlug (including power cable)
Remove A9 SmartPlug from the camera
Disconnect data cable (UNI cable) from the ENTIRE (usually connected from UNI-B to “CONTROL” port of A9 SmartPlug)
STEP 2
Configure UNI-A port to AC Link mode
STEP 3
Open Entire’s MENU
Navigate to Miscellaneous
Scroll down to “TOOLS”
Click to AC Link update tool
STEP 4
Follow commands shown in update tool window:
Press ENABLE
Disconnect device from UNI-A if you used it for other connection
STEP 5
Connect UNI cable to UNI-A port of the ENTIRE (disconnec device from UNI-A if used)
Second end of this UNI cable conect to the SmartPlug port labeled “UPDATE”
UNI-A port will NOT get “online” during this process
SmartPlug will start blinking blue after few seconds
Do not connect power input to the SmartPlug!
Press CONNECT
InfoFirmware recovery tool under link "Problems?" does not work for SmartPlug. If the firmware update fails, we may need to ship the SmartPlug back to us for recovery.
STEP 6
At this point ENTIRE may fail to recognize SmartPlug (Recognized device will be “N/A”). If this happens, close FW upgrading tool and start over (disconnect and reconnect Smartplug as per first steps)
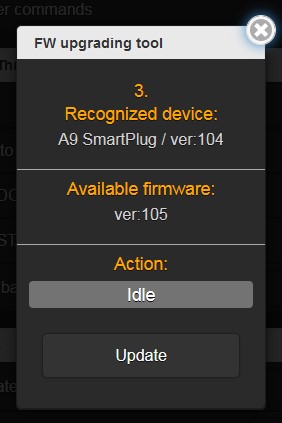
If ENTIRE recognized A9 SmartPlug correctly:
DO NOT TOUCH SMARTPLUG
DO NOT MOVE SMARTPLUG
Press “Update” button
STEP 7
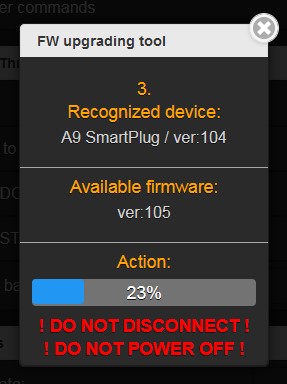
Entire will now upload new firmware
DO NOT POWER OFF
DO NOT TOUCH SMARTPLUG
DO NOT MOVE SMARTPLUG
Process is quick and takes just few seconds
STEP 8
A successful firmware update is confirmed by a “SUCCESS” message.
At this point you may get “Timeout” message as result, this usually does not affect firmware update process
STEP 9
Reconnect UNI cable from “UPDATE” port of the SmartPlug back to “CONTROL”
Reconnect A9 SmartPlug back to UNI-B as per your previous connection
Reconnect / reconfigure all other devices as per your previous configuration
New featuresC1 and C2 buttons can be now triggered via "SoftKey 1" and "SoftKey 2" functions of the ENTIRE You may need to map those functions to C1 and C2 buttons of your Link or MavCam depending on your configuration.
New featuresBy default ENTIRE uses IR commands to control MENU/OK/Left/Right/Up/Down, if you would like to switch those functions to newly updated A9 SmartPlug, follow this manual
AIR Commander Link and Link v2 can be updated via Entire’s web GUI. Firmware for the Link and Link v2 is burned in the Entire’s firmware. Available firmware version can differ per Entire’s firmware image.
Firmwar eupdate must be done twice, once for Link Receiver and once for Link Transmitter unit.
Update process
STEP 1
(this step is usually already done)
Connect AIR Commander Link to UNI A/B/C port.
Configure port to AC Link mode.
STEP 2
Open Entire’s MENU
Navigate to Miscellaneous
Scroll down to “TOOLS”
Click to AC Link update tool
STEP 3
Follow commands shown in update tool window:
Disconnect device wire
Then press ENABLE
STEP 4
Reconnect device cable
Then press CONNECT
STEP 5
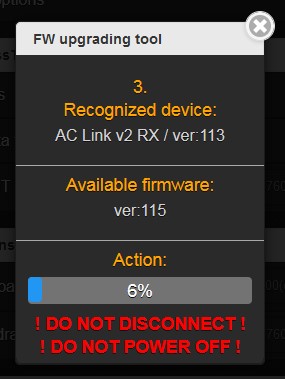
Now you should see:
connected device type and firmware version
Available firmware (if any)
Press “Update”
STEP 6
Entire will now upload new firmware
DO NOT POWER OFF
STEP 7
A successful firmware update is confirmed by a “SUCCESS” message.
STEP 8
Repeat process for Link Transmitter!
Recover device
Life is not perfect. Firmware update failure may occur due to cable issue, power issue or many other reasons. AIR Commander Link can be recovered from almost any failure, here is procedure:
STEP 1
Connect AIR Commander Link to UNI A/B/C port.
Configure port to AC Link mode.
STEP 2
Open Entire’s MENU
Navigate to Miscellaneous
Scroll down to “TOOLS”
Click to AC Link update tool
STEP 3
Follow commands shown in update tool window:
Disconnect device wire
Then press ENABLE
STEP 4
Reconnect device cable
Then press PROBLEMS?
STEP 5
New window will not show connected device.
Press “RECOVER!“
Entire will now try to:
discover what kind of device is connected
detect proper firmware from internal database
recover device
STEP 6
Entire will now upload new firmware
DO NOT POWER OFF
STEP 7
A successful firmware update is confirmed by a “SUCCESS” message.
A9 SmartPlug firmware update
The A9 SmartPlug firmware update process is very similar to the LINK update described above. However, there are some minor differences and risks, so do not start this process if you have an important job coming up soon. We do not recommend this procedure if you do not need any of the new features.
New firmware 105 for A9 SmartPlug brings:
Default battery charge state is 50% if ENTIRE is not connected (was 0%). Once ENTIRE is connected the SmartPlug battery charge status will get to 100%
Newly can be controlled via SmartPlug “focus point joystick” (Left / Right / Up / Down / Center)
Newly can be controlled C1 and C2 HW buttons of the camera via A9 SmartPlug
Feel free to drop us email if you are not sure about this.
STEP 1
Make sure your ENTIRE is running latest firmware (at least 1.746)
Disconnect all cables from A9 SmartPlug (including power cable)
Remove A9 SmartPlug from the camera
Disconnect data cable (UNI cable) from the ENTIRE (usually connected from UNI-B to “CONTROL” port of A9 SmartPlug)
STEP 2
Configure UNI-A port to AC Link mode
STEP 3
Open Entire’s MENU
Navigate to Miscellaneous
Scroll down to “TOOLS”
Click to AC Link update tool
STEP 4
Follow commands shown in update tool window:
Press ENABLE
Disconnect device from UNI-A if you used it for other connection
STEP 5
Connect UNI cable to UNI-A port of the ENTIRE (disconnec device from UNI-A if used)
Second end of this UNI cable conect to the SmartPlug port labeled “UPDATE”
UNI-A port will NOT get “online” during this process
SmartPlug will start blinking blue after few seconds
Do not connect power input to the SmartPlug!
Press CONNECT
InfoFirmware recovery tool under link "Problems?" does not work for SmartPlug. If the firmware update fails, we may need to ship the SmartPlug back to us for recovery.
STEP 6
At this point ENTIRE may fail to recognize SmartPlug (Recognized device will be “N/A”). If this happens, close FW upgrading tool and start over (disconnect and reconnect Smartplug as per first steps)
If ENTIRE recognized A9 SmartPlug correctly:
DO NOT TOUCH SMARTPLUG
DO NOT MOVE SMARTPLUG
Press “Update” button
STEP 7
Entire will now upload new firmware
DO NOT POWER OFF
DO NOT TOUCH SMARTPLUG
DO NOT MOVE SMARTPLUG
Process is quick and takes just few seconds
STEP 8
A successful firmware update is confirmed by a “SUCCESS” message.
At this point you may get “Timeout” message as result, this usually does not affect firmware update process
STEP 9
Reconnect UNI cable from “UPDATE” port of the SmartPlug back to “CONTROL”
Reconnect A9 SmartPlug back to UNI-B as per your previous connection
Reconnect / reconfigure all other devices as per your previous configuration
New featuresC1 and C2 buttons can be now triggered via "SoftKey 1" and "SoftKey 2" functions of the ENTIRE You may need to map those functions to C1 and C2 buttons of your Link or MavCam depending on your configuration.
New featuresBy default ENTIRE uses IR commands to control MENU/OK/Left/Right/Up/Down, if you would like to switch those functions to newly updated A9 SmartPlug, follow this manual