For some usage scenarios is important to have information about distance of photographed object from the camera. For example, when you need to measure length of cracks in the concrete dam. For this purpose we’ve implemented LightWare rangefinders compatibility and direct geotagging of the distance value to the EXIF during geotagging.
As LightWare lasers usually comes with tinned wire ends, we can not provide adapting cable. User needs to solder own cable solution depending on laser model.
From every geotagging set you will get one spare (unused) cable matching UNI ports of the Entire. In case of PixHawk users, there will be additional DJI cable and vice versa, additionally for mapping users there is also SBUS cable which can be used for laser cable creation.
For some usage scenarios is important to have information about distance of photographed object from the camera. For example, when you need to measure length of cracks in the concrete dam. For this purpose we’ve implemented LightWare rangefinders compatibility and direct geotagging of the distance value to the EXIF during geotagging.
Connection cable
As LightWare lasers usually comes with tinned wire ends, we can not provide adapting cable. User needs to solder own cable solution depending on laser model.
From every geotagging set you will get one spare (unused) cable matching UNI ports of the Entire. In case of PixHawk users, there will be additional DJI cable and vice versa, additionally for mapping users there is also SBUS cable which can be used for laser cable creation.
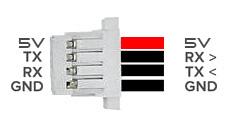
Wiring is provided below.
Installation
STEP 1
Connect the LightWare range finder to the Entire port A/B/C as per this wiring.
Power for the rangefinder will be provided by the Entire. Power for the rangefinder can be supplied externally.
For some models may colors of wires differ. Please follow this pinout if you do not have colors as per image:
STEP 2
Some models need to enable “Legacy mode” of communication. Follow the manual for your Range finder model.
STEP 3
Open Entire’s GUI and configure port to LightWare. Port should go “online” in few seconds.
STEP 4
Once port is online, value measured at the moment of the capture will be stored in the EXIF as “SubjectDistance” during process of geotagging.
For this purpose range finder should be mounted close to the camera and aimed to the center of the image