SmartPlug can be used only for Sony cameras. Camera control via SmartPlug is not necessary when Geotagging features are not used. For all “movie” or “photographer” usage scenario is SmartPlug not necessary, however can speed-up camera control. For users who intend to use Geotagging, SmartPlug will bring back some control features unavailable during Geotagging. Full list of compatibility & features is available here.
Input power!SmartPlug needs solid power input with at least 2Amps of current available. If weak power source is used, Camera may reboot randomly.
Proper power source:
12 - 14,5V / 2A
Saving settings in the cameraIf you would like to save current camera settings permanently, you have to power OFF the camera by power switch before power disconnection! When power is disconnected, the camera will not save current settings. This may be handy for some usage scenarios as after power disconnection your camera will be set to the previous configuration.
With SmartPlug you will get full control above the camera by simulation of battery grip via SmartPlug and all other control is done via IR & Multiport.
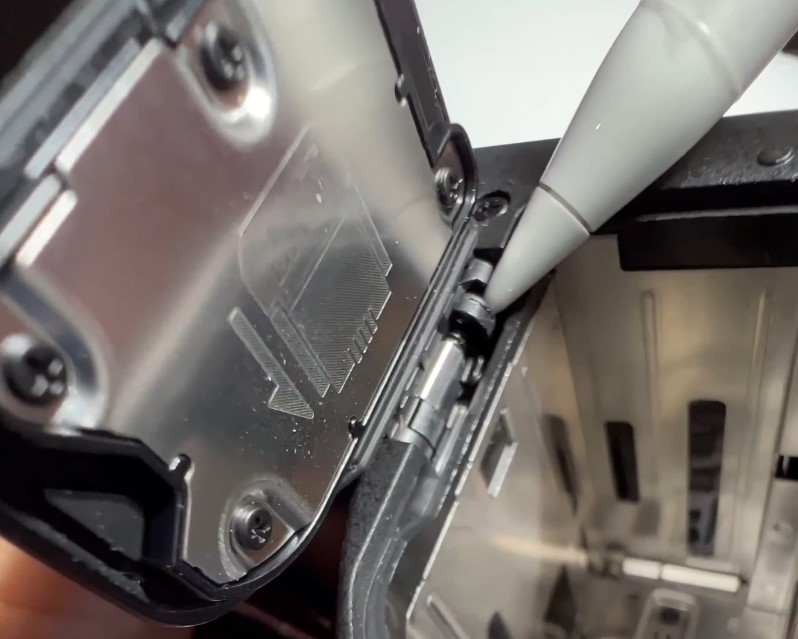
Connect data cable from the SmartPlug to the Entire PORT B
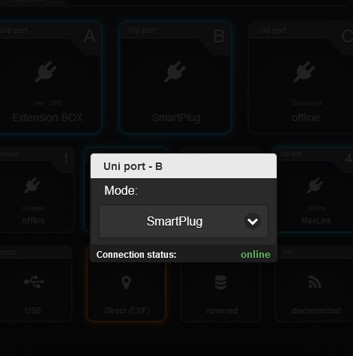
Configure PORT B in the Entire to “SmartPlug” mode.
Connect power to the SmartPlug (12-14,5V)
Entire will automatically use SmartPlug for control of Speed / Aperture / ISO / Exposure corr.
If you have swapped functions Aperture / Speed control, please swap function of “wheels” in the camera MENU. As SmartPlug controls directly front and rear wheels rotation, most probably you have swapped these functions in the camera.
Controlling of ISO and Exposure correction via SmartPlug #
A9 SmartPlug or A7 SmartPlug can directly control rotation of front wheel, rear wheel of the Camera, press C1 and C2 buttons and trigger halfpress and fullpress of shutter button. Following procedure shows how to control ISO and Exposure correction with these functions directly, without necessity to enter menu and control values there. With those settings you will be able to control ISO/Exp.Corr. via Entire’s functions ISO+- and Exposure Cor+-
In “newer” mode, Entire will (for example) for ISO change firstly press C1 button at the camera, then rotate wheel for one step and release C1. Exposure correction control works the same, only Entire uses C2 button.
Open Camera MENU and navigate to “Custom Key Settings”
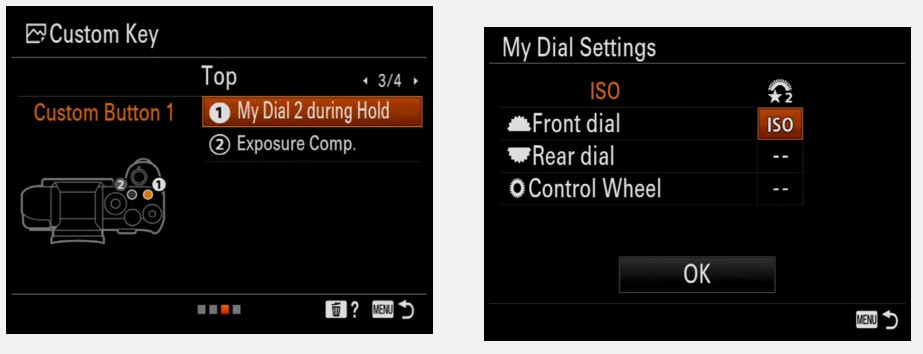
Navigate to “Custom Button 1” and set to “My Dial 2 during Hold”
In the submenu select Front dial alternative to ISO
Navigate to “Custom Button 2” and set to Exposure Comp.
Open Entire’s MENU and navigate to Miscellaneous -> Sony
Open “SmartPlug ISO Control” and set to Newer
*** if you found no menu items similar to images at right, please follow lower approach for older cameras
In “older” mode, Entire will for ISO change firstly press C1 and release to open mini-menu for ISO cotntrol, then rotate wheel by one step and again shortly press C1 to hide mini-menu. Exposure correction control works the same, only Entire uses C2 button.
Open Camera MENU and navigate to “Custom Key Settings”
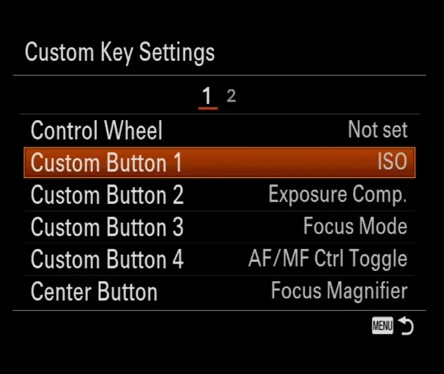
Navigate to “Custom Button 1” and set to ISO
Navigate to “Custom Button 2” and set to Exposure Comp.
Open Entire’s MENU and navigate to Miscellaneous -> Sony
Instead of these two pre-defined solutions, you can also map ISO / Exp.Corr. function in the camera to any button controllable via Entire (Left/Right/Up/Down/OK/C1/C2). Then once triggered via one of this buttons, simply navigate up/down in the camera mini-menu.
In the practice to step ISO UP or DOWN you will press LEFT and then UP or DOWN to change ISO and then OK to hide mini-menu of the camera.
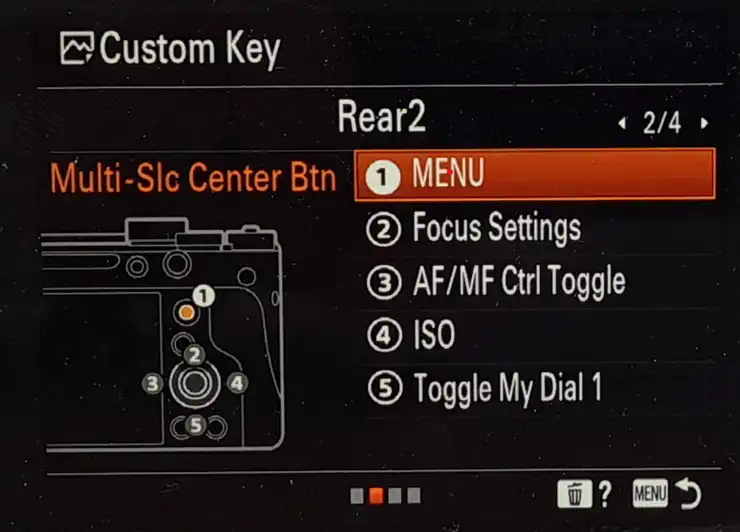
Controlling of MENU and navigation via SmartPlug #
A9 SmartPlug can remotely press “Joystick” of A7R4 and A7R5 camera (and other with this joystick). Newest Sony models does not have IR control option, so SmartPlug can be used to control of MENU and navigation. ENTIRE uses center button to open MENU and OK in the MENU.
To escape the MENU use Photo or AF trigger.
Needs update!Make sure your SmartPlug runs latest firmware! Update manual
SmartPlug can be used only for Sony cameras. Camera control via SmartPlug is not necessary when Geotagging features are not used. For all “movie” or “photographer” usage scenario is SmartPlug not necessary, however can speed-up camera control. For users who intend to use Geotagging, SmartPlug will bring back some control features unavailable during Geotagging. Full list of compatibility & features is available here.
Input power!SmartPlug needs solid power input with at least 2Amps of current available. If weak power source is used, Camera may reboot randomly.
Proper power source:
12 - 14,5V / 2A
Saving settings in the cameraIf you would like to save current camera settings permanently, you have to power OFF the camera by power switch before power disconnection! When power is disconnected, the camera will not save current settings. This may be handy for some usage scenarios as after power disconnection your camera will be set to the previous configuration.
Installation of SmartPlug
With SmartPlug you will get full control above the camera by simulation of battery grip via SmartPlug and all other control is done via IR & Multiport.
Connect data cable from the SmartPlug to the Entire PORT B
Configure PORT B in the Entire to “SmartPlug” mode.
Connect power to the SmartPlug (12-14,5V)
Entire will automatically use SmartPlug for control of Speed / Aperture / ISO / Exposure corr.
If you have swapped functions Aperture / Speed control, please swap function of “wheels” in the camera MENU. As SmartPlug controls directly front and rear wheels rotation, most probably you have swapped these functions in the camera.
Controlling of ISO and Exposure correction via SmartPlug
A9 SmartPlug or A7 SmartPlug can directly control rotation of front wheel, rear wheel of the Camera, press C1 and C2 buttons and trigger halfpress and fullpress of shutter button. Following procedure shows how to control ISO and Exposure correction with these functions directly, without necessity to enter menu and control values there. With those settings you will be able to control ISO/Exp.Corr. via Entire’s functions ISO+- and Exposure Cor+-
Settings for newer cameras (like A7R4)
In “newer” mode, Entire will (for example) for ISO change firstly press C1 button at the camera, then rotate wheel for one step and release C1. Exposure correction control works the same, only Entire uses C2 button.
Open Camera MENU and navigate to “Custom Key Settings”
Navigate to “Custom Button 1” and set to “My Dial 2 during Hold”
In the submenu select Front dial alternative to ISO
Navigate to “Custom Button 2” and set to Exposure Comp.
Open Entire’s MENU and navigate to Miscellaneous -> Sony
Open “SmartPlug ISO Control” and set to Newer
*** if you found no menu items similar to images at right, please follow lower approach for older cameras
Settings for older cameras (like A7R2)
In “older” mode, Entire will for ISO change firstly press C1 and release to open mini-menu for ISO cotntrol, then rotate wheel by one step and again shortly press C1 to hide mini-menu. Exposure correction control works the same, only Entire uses C2 button.
Open Camera MENU and navigate to “Custom Key Settings”
Navigate to “Custom Button 1” and set to ISO
Navigate to “Custom Button 2” and set to Exposure Comp.
Open Entire’s MENU and navigate to Miscellaneous -> Sony
Open “SmartPlug ISO Control” and set to Older
Custom settings
Instead of these two pre-defined solutions, you can also map ISO / Exp.Corr. function in the camera to any button controllable via Entire (Left/Right/Up/Down/OK/C1/C2). Then once triggered via one of this buttons, simply navigate up/down in the camera mini-menu.
In the practice to step ISO UP or DOWN you will press LEFT and then UP or DOWN to change ISO and then OK to hide mini-menu of the camera.
Controlling of MENU and navigation via SmartPlug
A9 SmartPlug can remotely press “Joystick” of A7R4 and A7R5 camera (and other with this joystick). Newest Sony models does not have IR control option, so SmartPlug can be used to control of MENU and navigation. ENTIRE uses center button to open MENU and OK in the MENU.
To escape the MENU use Photo or AF trigger.
Needs update!Make sure your SmartPlug runs latest firmware! Update manual