


View Categories

Gremsy T3 | S1 | T7 installation for TAG-E

2 min read

About this usage scenario #

This manual is about TAG-E connection and installation for connection to Gremsy T3v3 | S1v3 | T7 gimbal and Sony ILX-LR1 camera. For this installation you need Gremsy T3v3 | S1v3 | T7 connection set from our store.
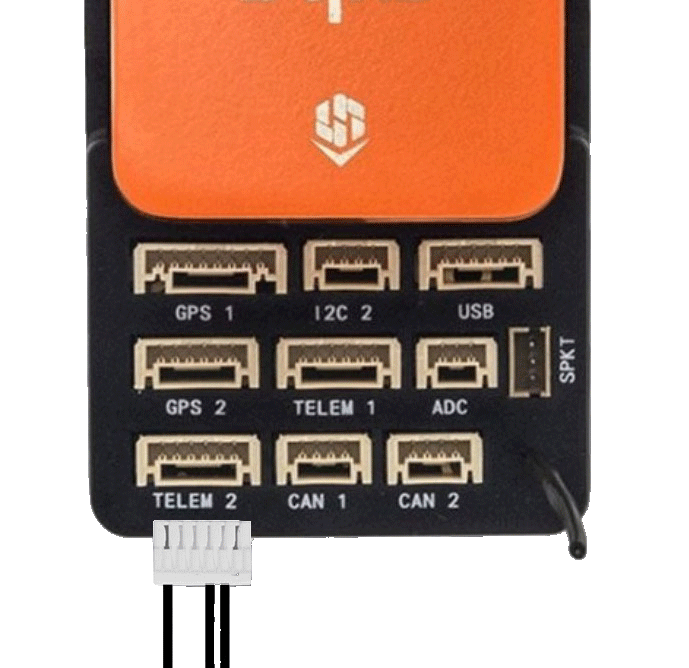
Our wiring set for Gremsy T3v3 uses Mavlink forwarding of the gimbal. That means, the TAG-E shares the same TELEM port as the gimbal and gimbal provides TAG-E all necessary data automatically. In this scheme you will need just one TELEM port of your Cube for the gimbal and camera control. Simple scheme of connection is on the picture below:

Gremsy T3 wiring set installation #

STEP 1

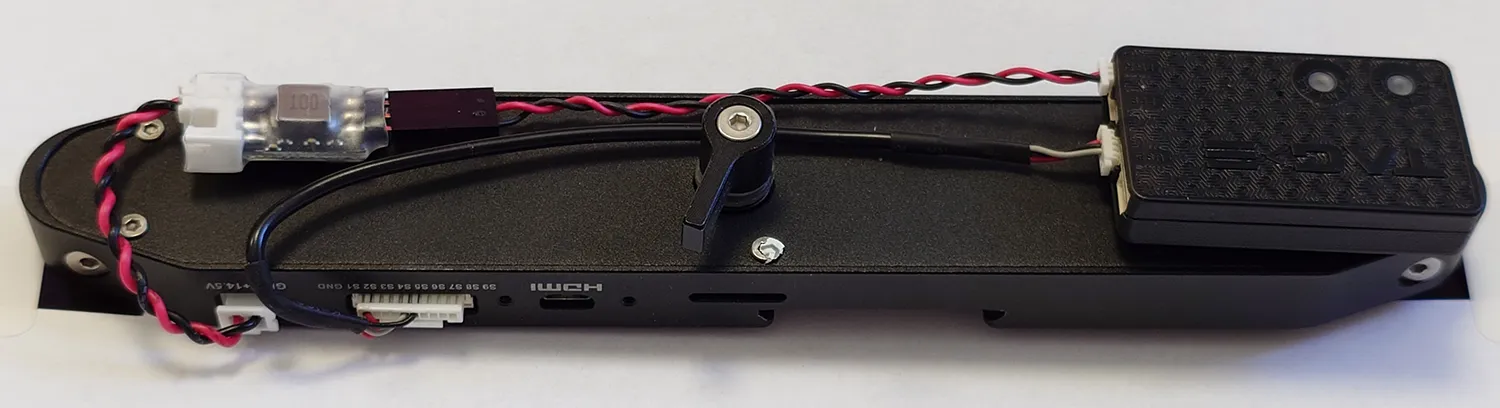
  • Let’s start with mount of Power Adaptor to the Gremsy gimbal
  • Connect included Gremsy power cable to the PWT OUT of the gimbal
  • Connect power cable to the upper connector (at the photo)
  • Use double self-adhesive tape, Zip Ties or self-adhesive zipper

STEP 2

  • Mount the TAG-E unit at the other side of the bottom of gimbal.
  • SD Card should be aimed outside of the gimbal for easy handling in the fields.
  • Use double self-adhesive tape or self-adhesive zipper is suggested.
  • Connect power outlet of the Power adaptor to PWR connector of the TAG-E

STEP 3

  • Connect AUX cable to bottom AUX port of your gimbal
  • Connect other end to the IO-B port of the TAG-E

STEP 4

  • Connect T3-MavLink cable to the COM and AUX port at quick release of the gimbal

STEP 5

  • Second end of T3-MavLink cable connect to your PixHawk flight controller telemetry port 1 or 2

Gremsy configuration #

STEP 1

Temporarily disconnect IO-B port from the TAG-E
Or you can disconnect COM4 port on Gremsy QR release

This step is necessary to establish MicroUSB connection of the gimbal to PC

STEP 2

Connect Gimbal via USB to your PC and launch gTune application

Navigate to:

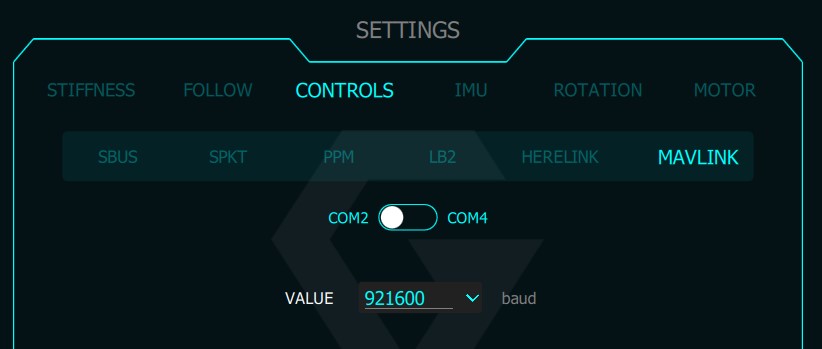
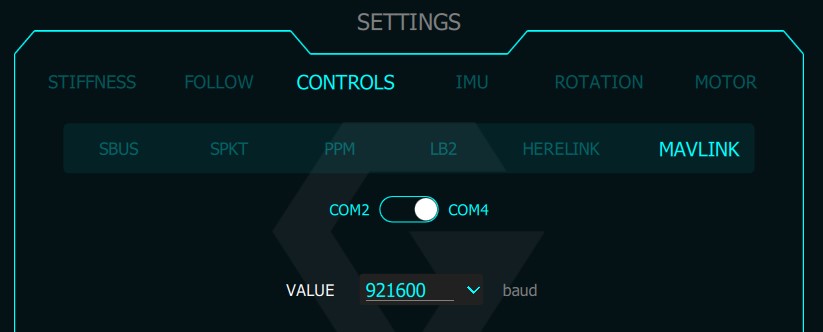
CONTROLS -> MAVLINK -> BAUDRATE

Set COM2 baudrate to 921 600

Set COM4 baudrate to 921 600
Click REBOOT when needed

STEP 3

Do all other settings you need to do in the gimbal and disconnect USB cable from QR.

Re-Connect COM4 to IO-B port cable to establish MavLink connection to TAG-E

Ardupilot configuration #

STEP 1

Make sure your Autopilot runs Ardupilot 4.6.0 or later
https://github.com/ArduPilot/ardupilot/releases

STEP 2

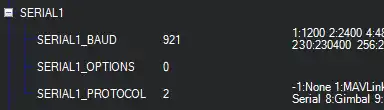
Follow Gremsy manual for all other Ardupilot related settings, just keep in mind that Gremsy->Cube baudrate is set to 921600 so TELEM port used in your flightcontroller needs to be set to 921600bps.

For Ardupilot is this set in SERIAL1_BAUD

STEP 3

  • Search section named SRx (x is number of port you used)
  • Make sure all SRx parameters are set to 0

STEP 4

  • Search for parameter CAM1_TYPE
    • Use CAM1_TYPE for Telem1 port, CAM2_TYPE if Telem2 is used
  • Configure this parameter to 6 to enable all Mavlink camera control features
  • Confirm by “Write Params”
  • Reboot the whole system to apply all settings
    • for older firmwares may be also valid value of 5, if you have issues with camera control, you may try both options. Remember to reboot whole system.

STEP 5

  • At this point you should be able to see TAG-E Mavlink messages and access all configuration and camera control

Camera configuration #

TAG-E works with the camera in default configiration, however, if you used other remote control systems, you may need to check these options:

STEP 1

About this usage scenario

This manual is about TAG-E connection and installation for connection to Gremsy T3v3 | S1v3 | T7 gimbal and Sony ILX-LR1 camera. For this installation you need Gremsy T3v3 | S1v3 | T7 connection set from our store.
Our wiring set for Gremsy T3v3 uses Mavlink forwarding of the gimbal. That means, the TAG-E shares the same TELEM port as the gimbal and gimbal provides TAG-E all necessary data automatically. In this scheme you will need just one TELEM port of your Cube for the gimbal and camera control. Simple scheme of connection is on the picture below:

Gremsy T3 wiring set installation

STEP 1

  • Let’s start with mount of Power Adaptor to the Gremsy gimbal
  • Connect included Gremsy power cable to the PWT OUT of the gimbal
  • Connect power cable to the upper connector (at the photo)
  • Use double self-adhesive tape, Zip Ties or self-adhesive zipper

STEP 2

  • Mount the TAG-E unit at the other side of the bottom of gimbal.
  • SD Card should be aimed outside of the gimbal for easy handling in the fields.
  • Use double self-adhesive tape or self-adhesive zipper is suggested.
  • Connect power outlet of the Power adaptor to PWR connector of the TAG-E

STEP 3

  • Connect AUX cable to bottom AUX port of your gimbal
  • Connect other end to the IO-B port of the TAG-E

STEP 4

  • Connect T3-MavLink cable to the COM and AUX port at quick release of the gimbal

STEP 5

  • Second end of T3-MavLink cable connect to your PixHawk flight controller telemetry port 1 or 2

Gremsy configuration

STEP 1

Temporarily disconnect IO-B port from the TAG-E
Or you can disconnect COM4 port on Gremsy QR release

This step is necessary to establish MicroUSB connection of the gimbal to PC

STEP 2

Connect Gimbal via USB to your PC and launch gTune application

Navigate to:

CONTROLS -> MAVLINK -> BAUDRATE

Set COM2 baudrate to 921 600

Set COM4 baudrate to 921 600
Click REBOOT when needed

STEP 3

Do all other settings you need to do in the gimbal and disconnect USB cable from QR.

Re-Connect COM4 to IO-B port cable to establish MavLink connection to TAG-E

Ardupilot configuration

STEP 1

Make sure your Autopilot runs Ardupilot 4.6.0 or later
https://github.com/ArduPilot/ardupilot/releases

STEP 2

Follow Gremsy manual for all other Ardupilot related settings, just keep in mind that Gremsy->Cube baudrate is set to 921600 so TELEM port used in your flightcontroller needs to be set to 921600bps.

For Ardupilot is this set in SERIAL1_BAUD

STEP 3

  • Search section named SRx (x is number of port you used)
  • Make sure all SRx parameters are set to 0

STEP 4

  • Search for parameter CAM1_TYPE
    • Use CAM1_TYPE for Telem1 port, CAM2_TYPE if Telem2 is used
  • Configure this parameter to 6 to enable all Mavlink camera control features
  • Confirm by “Write Params”
  • Reboot the whole system to apply all settings
    • for older firmwares may be also valid value of 5, if you have issues with camera control, you may try both options. Remember to reboot whole system.

STEP 5

  • At this point you should be able to see TAG-E Mavlink messages and access all configuration and camera control

Camera configuration

TAG-E works with the camera in default configiration, however, if you used other remote control systems, you may need to check these options:

STEP 1